⚡ Quick Actions Dashboard
The Quick Actions section provides one-click access to essential server operations,
giving you immediate control over your Minecraft Bedrock server with buttons that
dynamically enable or disable based on server status.
Start Server
The Start Server button launches your Minecraft Bedrock server with a single click.
This button is only enabled when the server is currently offline, preventing duplicate
server instances. When clicked, the wrapper automatically starts the server process
using your configured server binary path and working directory. The button becomes
disabled once the server successfully starts, and the server status indicator updates
to show the server is online.
Stop Server
The Stop Server button gracefully shuts down your server, ensuring all player data
and world changes are properly saved before termination. This button is only enabled
when the server is running, preventing attempts to stop an already-stopped server.
The wrapper sends the appropriate shutdown commands to ensure a clean server stop,
protecting your world data and preventing corruption. After stopping, all server
processes are properly terminated.
Backup
The Backup button allows you to create a manual backup of your entire server folder
on-demand, regardless of your automated backup schedule. This feature requires that
at least one backup job is configured in your settings. When clicked, it creates a
complete backup archive containing all server files including worlds, configurations,
behavior packs, resource packs, and player data. The backup uses your configured
backup directory and follows the same backup method (Stop/Backup/Restart or Save
Hold/Query/Resume) as your backup jobs.
Auto Update
The Auto Update feature automatically downloads and installs the latest Minecraft
Bedrock server version available from Mojang. With a single click, the wrapper
checks for updates, downloads the latest server files, and installs them while
preserving your server configuration and world data. This ensures your server
always runs the latest stable version with bug fixes and new features. The update
process includes verification to ensure file integrity before installation.
👥 Players Overview
The Players Overview section displays comprehensive information about all players
who have connected to your server, providing real-time tracking and player management
capabilities directly from the dashboard.
Player Cards
Each player who has joined your server is displayed in a dedicated player card.
These cards show a wealth of information that helps you monitor and manage your
player base effectively. The cards are updated in real-time as players interact
with your server, providing live status information.
Player Information Displayed
- Player Icon: A visual indicator showing whether the player is
currently online (green dot) or offline (gray dot). This makes it easy to see
at a glance who is active on your server.
- Health & Level: Displays the player's current health points
(HP) and their experience level. This information updates in real-time as players
play, take damage, or gain experience.
- Position: Shows the last known coordinates (X, Y, Z) where
the player was located. This is useful for tracking player movement, finding
lost players, or understanding world exploration patterns.
- Kills: Displays total kill statistics including mob kills and
player kills, if kill tracking is enabled. This helps you understand player
activity and engagement levels.
- Copy ID: A convenient button to copy the player's XUID
(Xbox User ID) to your clipboard. XUIDs are essential for advanced server
management, whitelisting, banning, or administrative commands.
- Status Badge: Color-coded status indicator - green dot
indicates the player is currently online and connected to the server, while
a gray dot indicates they are offline.
Data Display Behavior
The information displayed in player cards depends on your Activity Logger and Player
History settings. If certain tracking features are disabled in your settings, those
fields will show "Not enabled" or be displayed in a grayed-out state to indicate
that the data is not being collected. This allows you to configure exactly what
player information you want to track and display based on your needs.
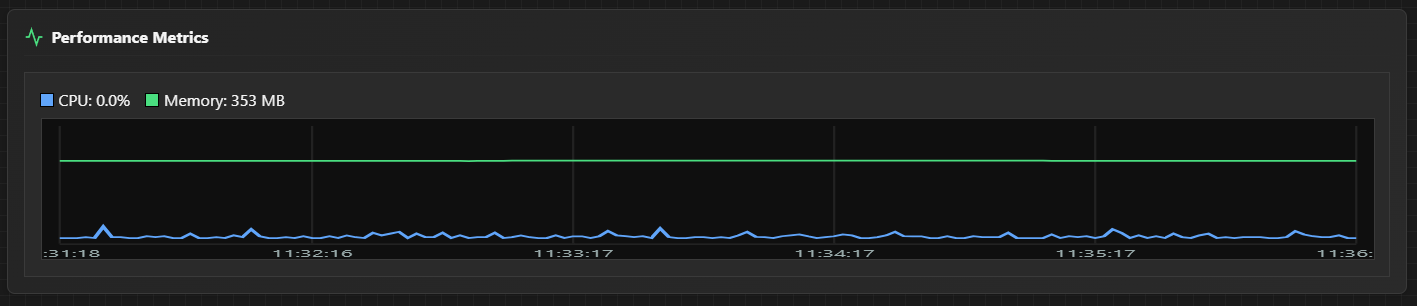
📊 Performance Metrics
Real-time performance graphs provide visual monitoring of your server's resource
usage, helping you identify performance bottlenecks and optimize server performance.
CPU Usage Graph
The CPU Usage graph displays the percentage of CPU resources consumed by your
Minecraft Bedrock server process over time. The graph uses a blue line to represent
CPU usage, making it easy to see patterns and spikes in processing demand. The graph
maintains a rolling window showing the last 150 data points, providing a historical
view of CPU utilization. This helps you identify when your server is under heavy
load, understand resource requirements, and plan for server upgrades or optimization
if needed.
Memory Usage Graph
The Memory Usage graph shows the amount of RAM consumed by your server process,
displayed in megabytes (MB). The graph uses a green line to represent memory usage
and automatically scales to fit the maximum value recorded, ensuring optimal
visibility regardless of your server's memory consumption level. Like the CPU graph,
it maintains a rolling window of the last 150 data points. Monitoring memory usage
helps you determine if your server has adequate RAM, identify memory leaks, and
optimize server settings for better performance.
Using Performance Metrics
By monitoring these performance graphs, you can identify performance issues or
resource-intensive periods on your server. For example, if you notice CPU spikes
during specific times or when certain activities occur, you can adjust server
settings or limit resource-intensive operations. Memory trends can help you
determine optimal server configuration and anticipate when you might need to
upgrade hardware or adjust server parameters.
💻 Server Console
The Server Console provides real-time access to all server output and allows you
to execute commands directly, giving you complete control over your Minecraft
Bedrock server through an integrated interface.
Server Logs Display
The console displays all stdout and stderr output from your Minecraft Bedrock server
in real-time. This includes game events, error messages, informational messages,
player join/leave notifications, chat messages, and all other server activity. The
logs are color-coded for easy reading, with errors typically displayed in red to
draw your attention to important issues. All server output is captured and displayed
chronologically, providing a complete audit trail of server activity.
Command Input
You can type and send commands directly to the server through the console input field.
The wrapper automatically prefixes commands with "/" if you don't include it, making
command entry more convenient. Commands are sent immediately when you press Enter,
allowing for quick server administration. This is useful for executing server commands
like op, ban, whitelist, give, and all other Minecraft Bedrock server commands without
needing to connect to the server as a player.
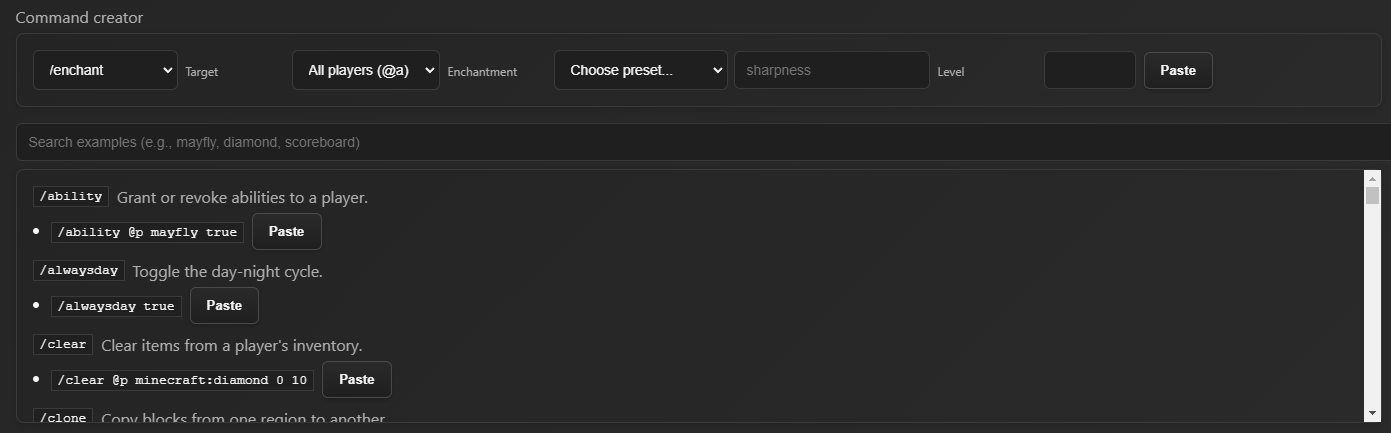
Command Builder
The Command Builder is an advanced feature that helps you construct complex commands
with parameter suggestions and validation. When building commands, the builder provides
hints about required and optional parameters, validates command syntax, and suggests
valid values for command parameters. This reduces errors and makes it easier to use
complex commands that you might not use frequently enough to memorize.
Scroll Modes
The console offers two scroll modes to accommodate different use cases:
- Show Latest: Automatically pins the view to the bottom of the
console, always showing the most recent server output. This mode is ideal when
you want to monitor current server activity in real-time.
- Enable Scroll: Allows manual scrolling through the console
history. In this mode, the console doesn't automatically jump to the latest
messages, allowing you to scroll up to review older logs without interruption.
Non-Intrusive Updates
The console does not auto-focus on new updates, meaning that when new log entries
appear, the console won't automatically scroll your view or interrupt your reading.
This allows you to scroll through and read console history without being constantly
pulled back to the latest messages, providing a better user experience when reviewing
logs or reading through server history.
🖥️ Multiple Server Instances
Run and manage multiple Minecraft Bedrock servers from a single application interface.
Each server instance operates completely independently, allowing you to host multiple
worlds, game modes, or server configurations simultaneously.
Instance Isolation
Each server instance you create is completely isolated from other instances, ensuring
that settings, worlds, backups, and player data never interfere with each other. This
isolation includes:
- Isolated Settings: Each instance maintains its own server
properties, binary paths, working directories, and all configuration options.
Changes to one instance never affect another.
- Separate Worlds: Worlds are stored independently per instance,
allowing you to run completely different game worlds simultaneously. You could,
for example, run a survival server and a creative server at the same time.
- Independent Backups: Backup jobs and backup files are
instance-specific. Each instance can have its own backup schedule and retention
policies without affecting other instances.
- Player Data: Player tracking, activity logs, and player history
are stored separately for each instance. Player information from one server never
appears in another instance's player list.
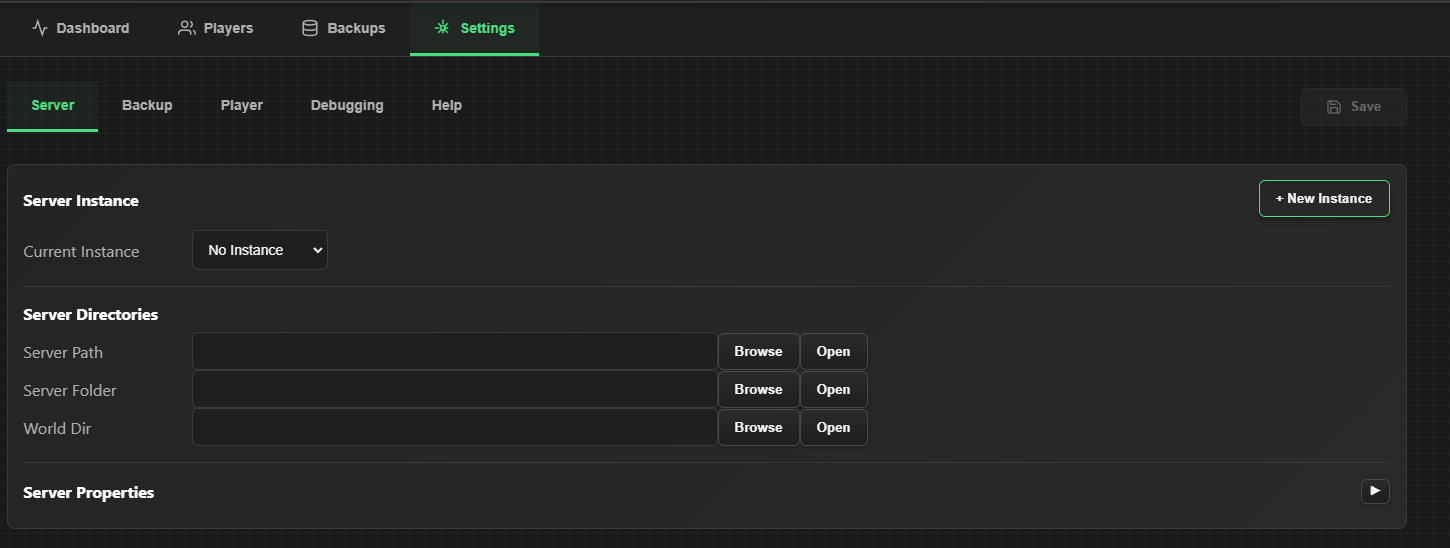
Instance Management
You can easily switch between your configured server instances using the instance
dropdown menu in the application header. When you switch instances, the entire
dashboard updates to show that instance's data, including player information,
console logs, performance metrics, and all settings. You can have as many instances
as your system resources allow, making it perfect for hosting multiple servers for
different communities, game modes, or purposes.
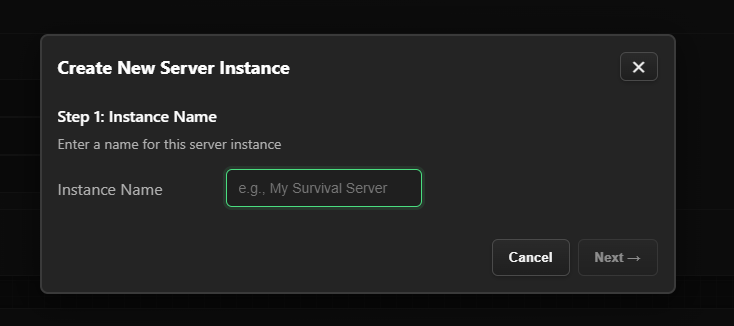
Creating Instances
When creating a new instance, you can choose to either download and set up a fresh
Minecraft Bedrock server automatically, or use an existing server folder you already
have on your computer. This flexibility allows you to migrate existing servers into
the wrapper or start new servers from scratch. Each instance is given a unique name
for easy identification in the instance dropdown.
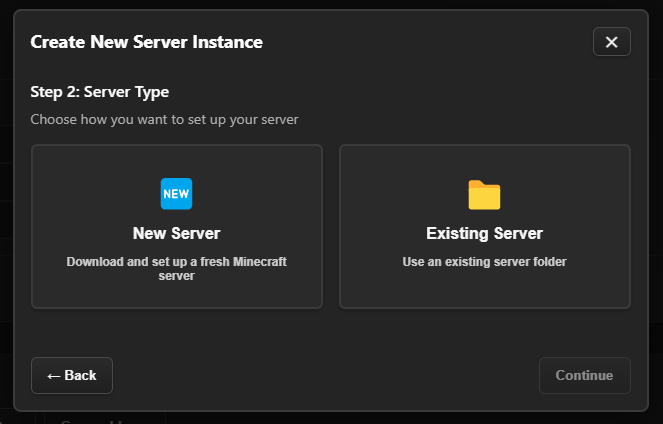
The instance creation wizard guides you through each step. First, you'll enter a
descriptive name for your instance. This name will appear in the instance dropdown
and helps you identify the server when managing multiple instances.
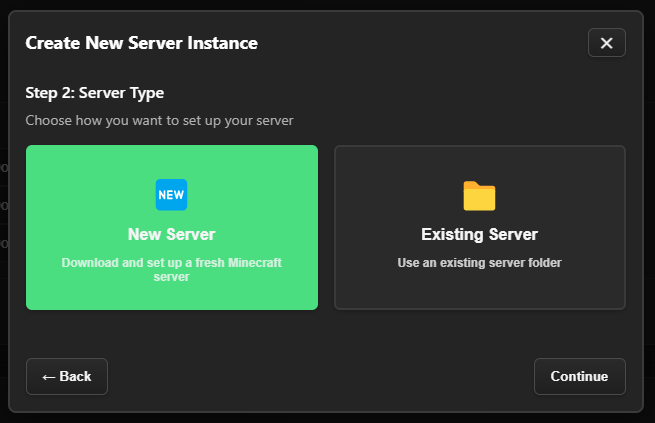
Next, you choose whether to create a new server (which downloads and sets up
everything automatically) or use an existing server folder from your computer.
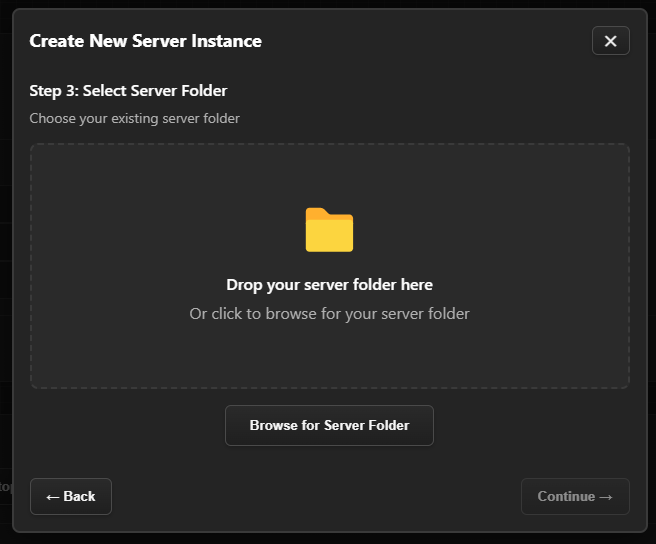
If you select an existing server, you'll then need to specify the server folder
location and configure paths.
New Server Setup
When creating a new server instance, the wizard can automatically download and set
up a fresh Minecraft Bedrock server:
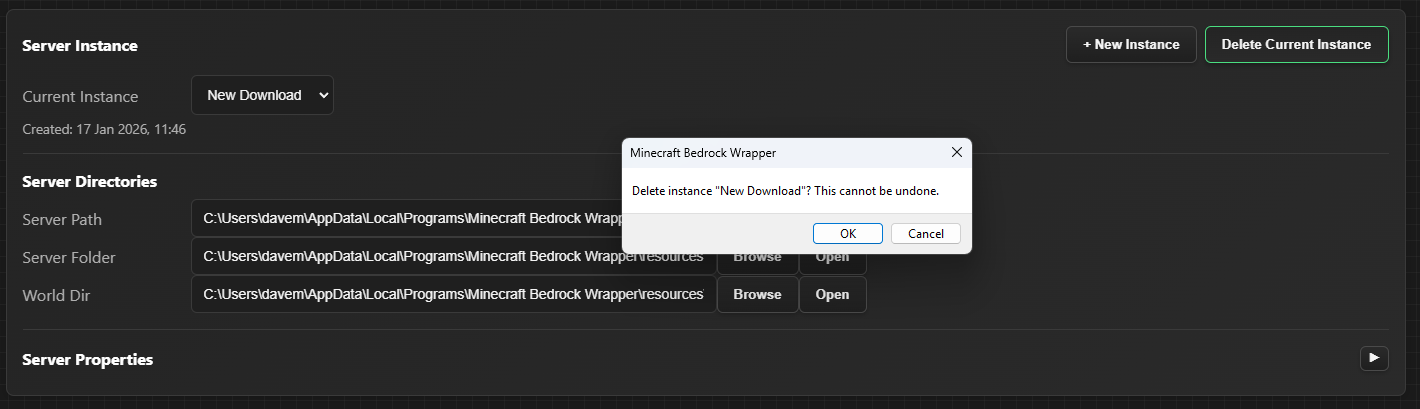
Managing Instances
You can manage your instances through the Settings page, including deleting instances
you no longer need:
🛡️ Automated Backups
Protect your server with flexible, automated backup systems that ensure your worlds
and server data are never lost. Create multiple backup jobs, each with its own
schedule and configuration options.
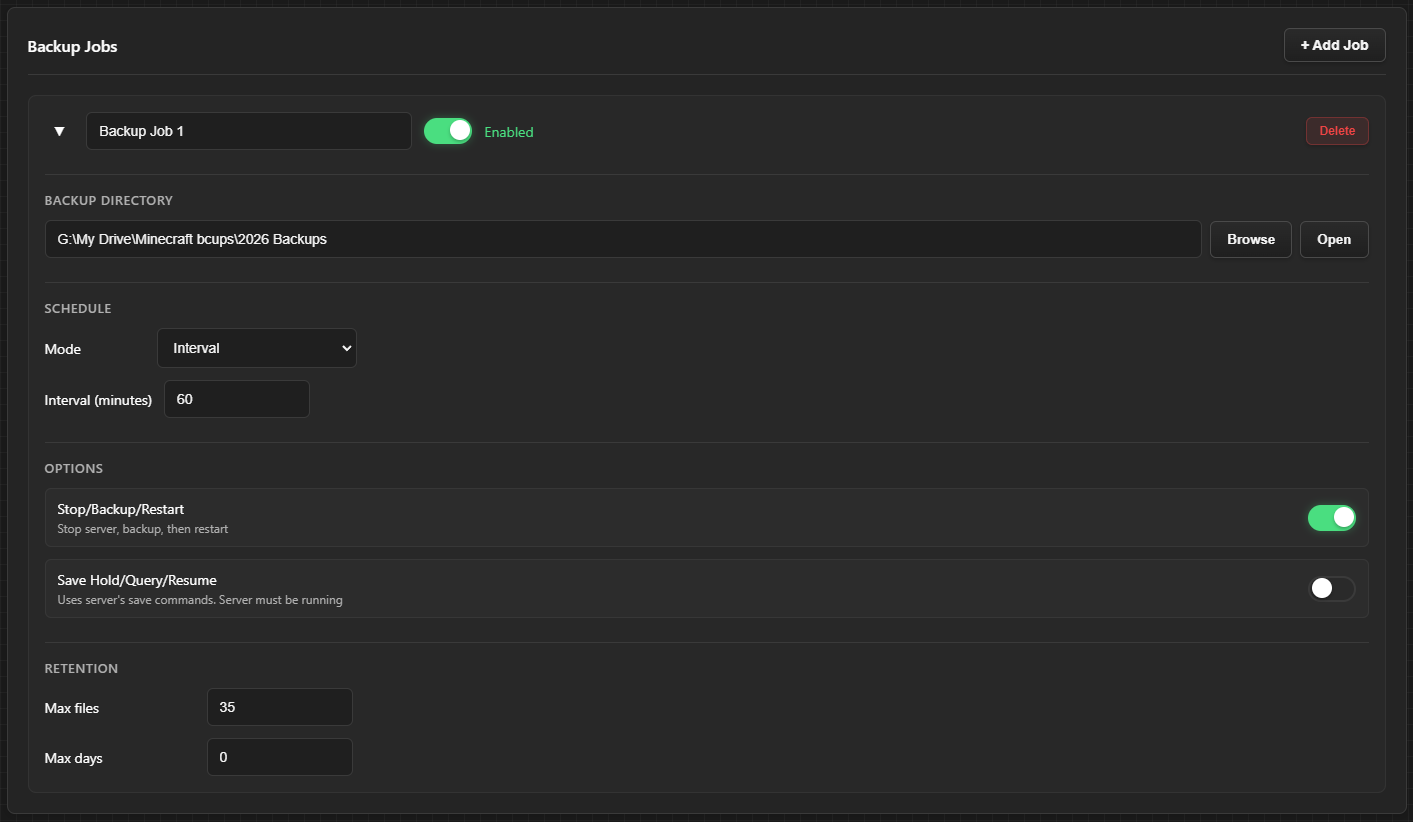
Backup Scheduling
You can schedule backups using two different methods:
- Interval Scheduling: Create backups at regular intervals, such
as every 60 minutes, every 2 hours, or any interval you specify. This is ideal
for active servers where you want frequent backups to minimize data loss in case
of issues.
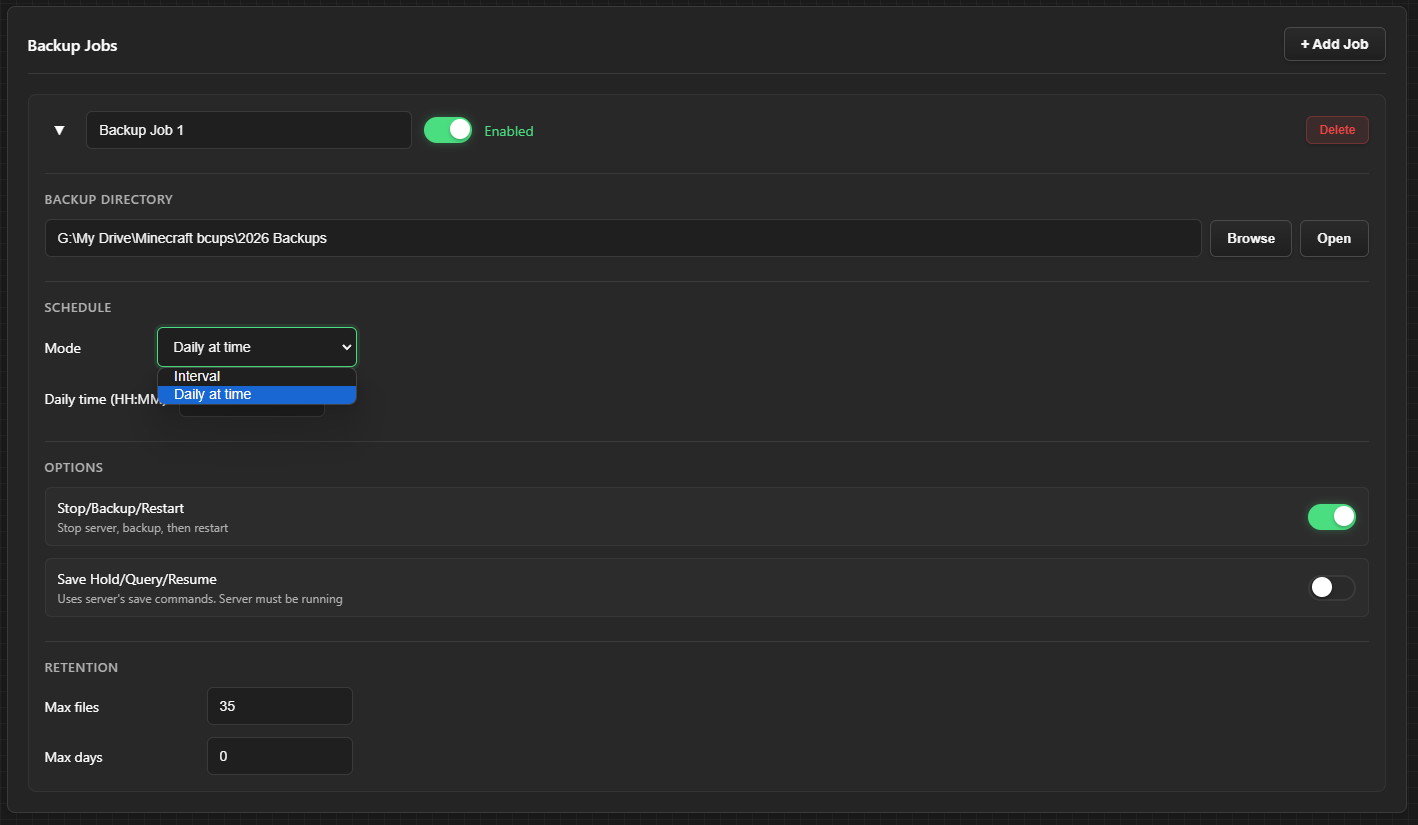
- Daily Scheduling: Schedule backups to run at a specific time
each day, such as 02:00 AM. This is useful for servers with predictable activity
patterns where you want consistent daily backups during low-traffic periods.
Backup Methods
The wrapper offers two different backup methods, each with its own advantages:
- Stop/Backup/Restart: This is the most reliable backup method.
It stops the server completely, creates a full backup of all server files, then
automatically restarts the server. This ensures complete data consistency but
results in brief server downtime during the backup process.
- Save Hold/Query/Resume: This method uses server commands to
create backups while the server continues running. The server is briefly paused,
the backup is created, and then normal operation resumes. This allows for
zero-downtime backups, but requires the server to be online and may be slightly
less reliable than the stop/backup/restart method.
Retention Policies
Configure automatic cleanup of old backups using retention policies. You can set
maximum files (e.g., keep only the last 10 backups) and/or maximum days (e.g.,
keep backups for 30 days). Older backups are automatically deleted according to
your policy, helping you manage disk space while maintaining an appropriate backup
history. The wrapper automatically enforces these policies when new backups are
created.
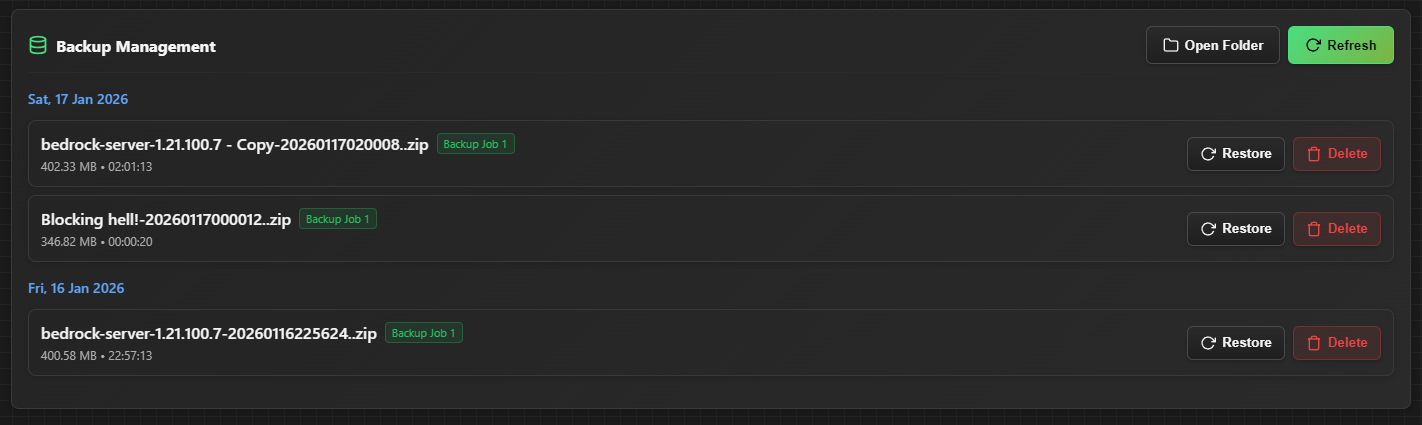
Backup Contents
Each backup includes the entire server folder, ensuring you can restore everything
if needed. This includes all worlds, server configurations, behavior packs, resource
packs, player data, whitelist files, and any other server files. Backups are stored
as ZIP archives in your configured backup directory, making them easy to manage,
transfer, or restore.
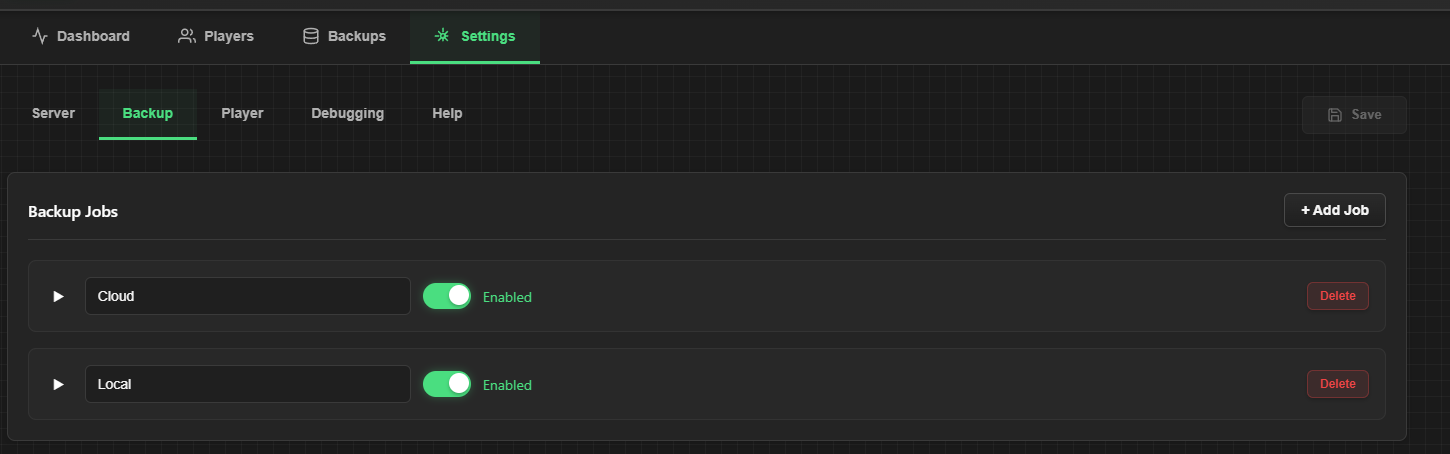
Multiple Backup Jobs
You can create multiple backup jobs for a single instance, each with its own
schedule and configuration. This allows you to have, for example, frequent interval
backups during active hours and daily backups during low-traffic periods, providing
comprehensive backup coverage for your server.
Instance-Specific Backups
Backup jobs are instance-specific, meaning each server instance can have its own
backup configuration. When viewing backups, you only see backups created by backup
jobs configured for that specific instance. This ensures backup organization and
prevents confusion when managing multiple servers.
📈 Player Activity Tracking
Comprehensive player monitoring with configurable tracking options that provide
detailed insights into player behavior, statistics, and server activity. Track
everything from health and location to kill counts and session history.
Activity Logger
The Activity Logger tracks real-time player statistics and updates them as players
interact with your server. You can enable or disable individual tracking options
based on what information you want to collect:
- Health & Max Health: Tracks current health points and maximum
health, updating in real-time as players take damage or heal.
- Experience Points & Level: Monitors player experience points
and level progression, showing how players are advancing through your server.
- Hunger/Food Level: Tracks player food levels, helping you
understand gameplay patterns and player engagement.
- Location (X, Y, Z): Continuously updates player position
coordinates, allowing you to track movement, find lost players, or analyze
world exploration patterns.
- Equipped Armor: Monitors what armor pieces players have
equipped, useful for understanding player progression and inventory management.
- Kills: Tracks comprehensive kill statistics including total
kills, mob kills (hostile and passive), and player kills. This helps you
understand player activity levels and engagement.
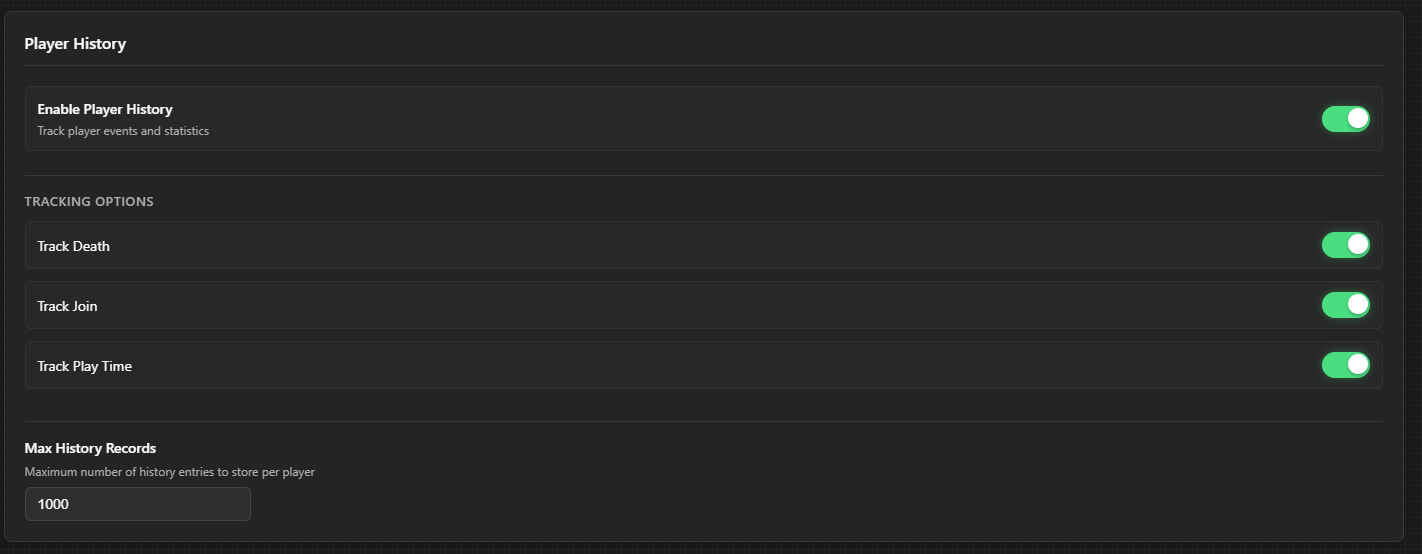
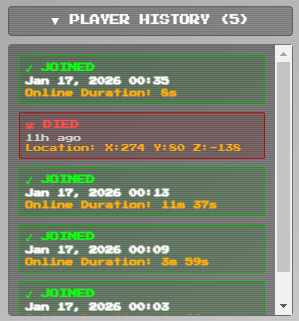
Player History
The Player History feature records significant player events, creating a log of
important server interactions:
- Join Events: Records when players join the server, including
timestamps. This helps you track server activity and understand peak play times.
- Disconnect Events: Records when players leave the server,
allowing you to analyze session lengths and player retention.
- Death Events: Records player deaths with location coordinates
and timestamps. This is useful for understanding dangerous areas in your world,
analyzing player skill levels, or helping players recover lost items.
- Time Played: Calculates and tracks the total time each player
has spent on your server, providing insights into player engagement and
retention.
Player History Interface
Access player history information through the dedicated player history interface:
Real-Time Updates
Player statistics update in real-time on the Dashboard as players interact with your
server. The data displayed automatically reflects the tracking options you have
enabled - if a tracking feature is disabled, the corresponding information will show
"Not enabled" or appear grayed out in the player cards. This gives you complete control
over what data is collected and displayed, allowing you to balance information needs
with privacy preferences or performance considerations.
Data Collection Behavior
The Activity Logger uses a behavior pack injected into your server to collect player
statistics. When the server starts, you'll see console messages about the behavior
pack deployment. Data collection only begins after the features are enabled and the
server is restarted, and only tracks players who join after the tracking is enabled.
This ensures accurate data collection and prevents confusion from missing historical
data.
🔧 Server Management Tools
Complete control over your Minecraft Bedrock server with integrated management
features that eliminate the need for command-line tools or manual file editing.
Server Control
Start, stop, and restart your server with one click through intuitive buttons on the
dashboard. The wrapper provides real-time server status indicators showing whether
your server is online or offline, and displays process information including PID
(Process ID) and runtime duration. Server control operations are safe and validated,
preventing common issues like duplicate server instances or improper shutdowns.
Console Interface
View all server output in real-time through the integrated console interface. Execute
commands directly or use the command builder for complex operations. The console
provides search functionality and scroll controls, making it easy to find specific
log entries or review server history. All console features work together to give you
complete visibility into your server's operation.
Performance Monitoring
Monitor CPU and memory usage with real-time graphs that track resource consumption
over time. These performance metrics help you identify performance bottlenecks and
resource usage patterns, allowing you to optimize server settings, plan for hardware
upgrades, or identify when resource-intensive operations are affecting server
performance.
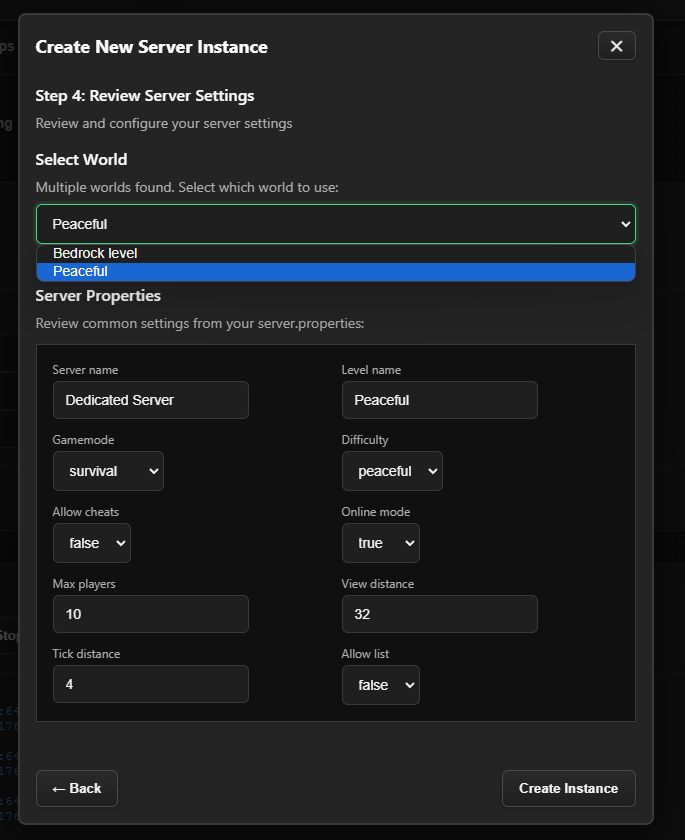
Server Properties Editor
Edit server.properties directly from the wrapper interface without needing to manually
locate and edit configuration files. Configure world settings, player limits, game
modes, difficulty levels, and all other server properties through an intuitive
interface. Changes are validated and saved automatically, reducing the risk of
configuration errors that could prevent the server from starting.
Auto Update System
Keep your server up to date with automatic update capabilities. Use the "Auto Update"
button on the Dashboard for one-click server updates, or access manual update tools
and repair utilities through Settings → Debugging → Server Maintenance Tools. The
update system preserves your configuration and world data while ensuring you're always
running the latest stable server version.
🌐 External Access via Play.it
Play.it (playit.gg) integration lets players connect to your server over the internet
without port forwarding or router configuration. The wrapper seamlessly integrates with
Play.it to provide one-click external access to your Minecraft Bedrock server.
What is Play.it?
Play.it is a free tunnel service that creates a secure connection between your local
server and the internet. It assigns a public address (e.g., yourserver.gl.at.ply.gg:19132)
that forwards to your local Minecraft server, eliminating the need for complex network
configuration.
Benefits:
- No router port forwarding needed
- Works behind NAT/firewalls
- Free service with no bandwidth limits for personal use
- Secure encrypted connections
- Supports both Bedrock and Java Edition
How It Works in the App
The wrapper integrates with the Play.it client to provide seamless external access:
- Automatic Client Management: Automatically downloads the Play.it
client if not already installed
- One-Click Control: Start/stop the tunnel with a single button click
- Address Display: Shows your public server address when the tunnel
is active
- Real-Time Status: Displays tunnel status and logs in real-time
- Claim Integration: Provides claim links for easy account setup
Setup Process
Step 1: Start the Tunnel
To begin setting up external access:
- Go to Settings → Server tab
- Find the "External access (Playit.gg)" section
- Click the "Start" button
First Time Setup:
- If the Play.it client isn't installed, the app downloads it automatically to
.playit/playit.exe
- The tunnel process starts in the background
- Status updates appear in real-time
Step 2: Claim Your Agent (First Time Only)
When you start the tunnel for the first time, you'll need to claim your agent:
- When you start the tunnel, you'll see a "Claim agent" button or
a claim URL in the status
- Click the "Claim agent" button (opens in your browser) OR copy
the claim URL
- Sign in or create a free account at playit.gg
- Complete the claim process - this links the tunnel agent to your account
Why Claim?
- Links the tunnel to your Play.it account
- Gives you access to the Play.it dashboard for advanced configuration
- Enables persistent tunnel addresses (optional)
Step 3: Configure the Tunnel (Play.it Dashboard)
After claiming, configure your tunnel in the Play.it dashboard:
- After claiming, open the Play.it Dashboard
- You'll see your agent listed
- Create a new tunnel:
- Click "New Tunnel" or "Add Tunnel"
- Select "Minecraft Bedrock" (or Java Edition if applicable)
- Set the Local Port:
19132 (Bedrock default) or
your configured port
- Choose a region (closest to you for best performance)
- Save the tunnel
Tunnel Configuration:
- Protocol: Minecraft Bedrock (or Java)
- Local Port: Must match your server's
server-port in
server.properties
- Remote Port: Assigned automatically by Play.it (or choose custom
if available)
Step 4: Share Your Server Address
Once the tunnel is active, share the address with players:
- The app displays your public address (e.g.,
cool-name.gl.at.ply.gg:19132)
- Click "Copy address" to copy it to clipboard
- Share this address with players who want to join your server
Players can connect using:
- The full address:
cool-name.gl.at.ply.gg:19132
- Or just
cool-name.gl.at.ply.gg (port may be auto-detected)
Using the Tunnel
Starting the Tunnel
To activate external access:
- Ensure your Minecraft server is running (or start it)
- Go to Settings → Server tab
- Click "Start" in the Play.it section
- Wait a few seconds for the tunnel to establish
- The status shows "Tunnel active" with your public address
Stopping the Tunnel
To disable external access:
- Click "Stop" in the Play.it section
- The tunnel closes immediately
- Your server is no longer accessible via the Play.it address
Viewing Tunnel Status
The app displays real-time tunnel information:
- Running Status: Green dot = active, Red dot = stopped
- Public Address: Your server's internet address (when active)
- Status Messages: Recent log output from the tunnel
- Claim URL: Link to claim agent (first time only)
Technical Details
Automatic Client Management
The wrapper automatically manages the Play.it client:
- Detection: Checks for existing Play.it installations in:
.playit/playit.exe (app's local directory)- Start Menu shortcuts (system-wide installation)
- Download: Auto-downloads from official sources if not found:
- GitHub:
github.com/playit-cloud/playit-agent
- Official:
playit.gg/download
- Storage: Client stored in
backend/.playit/playit.exe
(relative to backend directory)
Process Management
The wrapper handles tunnel process lifecycle:
- Background Process: Tunnel runs as a separate process
- Log Capture: Captures stdout/stderr for status display
- Auto-Cleanup: Process terminated when app closes (or you click Stop)
Address Parsing
The app automatically extracts connection information:
- Tunnel Address: From Play.it output (e.g.,
server.gl.at.ply.gg:19132)
- Claim URLs: From Play.it initialization output
Troubleshooting
Issue: "Failed to download Playit client"
- Solution: Check internet connection. The app tries multiple download
sources.
- Manual Fix: Download from playit.gg/download
and place in
.playit/playit.exe
Issue: "Tunnel active but no address shown"
- Wait: It can take 10-30 seconds for the address to appear
- Check Logs: Look at the tunnel logs in the app for connection status
- Claim Agent: If this is your first time, you may need to claim
the agent first
Issue: "Players can't connect"
- Verify Server Running: Your Minecraft server must be running
- Check Port: Ensure the Play.it tunnel port matches your server's
server-port
- Check Firewall: Windows Firewall should allow the Play.it client
(usually auto-configured)
- Try Restart: Stop and start the tunnel again
Issue: "Claim URL expired"
- Solution: Restart the tunnel to get a new claim URL, or claim via
the Play.it dashboard
Issue: "Tunnel keeps stopping"
- Check Logs: Look for error messages in the tunnel status logs
- Internet Connection: Ensure stable internet connection
- Play.it Status: Check status.playit.gg
for service issues
Best Practices
To ensure reliable external access:
- Start Server First: Start your Minecraft server before starting
the tunnel
- Keep Tunnel Running: Leave the tunnel running while players are
connected
- Monitor Status: Check the tunnel status regularly to ensure it's
active
- Backup Address: Save your tunnel address for future sessions (it
may change if you don't claim)
- Security: Only share your server address with trusted players
Limitations
Important considerations when using Play.it:
- Free Tier: Play.it free tier may have occasional downtime or rate
limits
- Address Changes: Unclaimed agents may get new addresses on restart
(claim to keep persistent)
- Performance: Adds small latency overhead (usually 10-50ms)
- Dependencies: Requires active internet connection on the host machine
Alternative: Manual Play.it Setup
If you prefer to manage Play.it separately:
- Download Play.it client from playit.gg/download
- Run it manually and claim via the Play.it dashboard
- Configure tunnels in the dashboard
- The app can still detect and use the system-installed client if it's in the Start
Menu
Note: The app's integration provides convenience (one-click start/stop)
but Play.it works independently if you prefer manual control.
🐛 Debugging & Diagnostics
Comprehensive debugging and diagnostic tools help you troubleshoot issues, monitor
system behavior, and maintain optimal server performance.
Granular Debug Logging
The wrapper includes granular debugging options organized by feature category. You can
enable specific debugging flags for only the features you're troubleshooting, reducing
log verbosity while providing detailed information about the areas you need to
investigate. Debug categories include:
Activity Logger
- Pack Deployment
- Config Injection
- Stats Parsing
Backups
- Operations
- Scheduler
- Retention
Instances
- Creation & Deletion
- Config Merging
- Switching
Players
- Connect & Disconnect
- Death Tracking
- Stats Updates
Server Manager
- Start & Stop
- Command Execution
- Log Streaming
File Operations
- Directory Operations
- File Copying
- Path Validation
Log Viewing and Analysis
Access detailed logging information through multiple methods:
- Console Tab: View real-time server output and debug logs when
enabled. Scroll through history or pin to latest messages for continuous monitoring.
- Debugging Tab: Access log files directly, download logs for
offline analysis, or share logs with support for troubleshooting assistance.
- Search Functionality: Use Ctrl+F (or Cmd+F on Mac) to search
through console logs for specific errors, messages, or events.
- Log File Access: Log files are stored in the application data
directory and can be accessed through the Debugging tab or directly from your
file system for advanced analysis.
Version Management
Keep your wrapper and server up to date with built-in version checking:
- Version Check: Use the "Check for New Version" button to verify
if a newer wrapper version is available.
- Auto Update: The wrapper can automatically download and apply
updates when new versions are detected.
- Server Updates: Automatic and manual server update options ensure
you're always running the latest Minecraft Bedrock server version.
🛠️ Server Maintenance Tools
Advanced maintenance and update tools for experienced users who need additional
control over server management beyond standard automatic features.
Repair Server
The Repair Server tool diagnoses and repairs common server installation issues. It
verifies file integrity, checks for missing or corrupted server files, and
automatically fixes problems when possible. This is useful when your server won't
start due to file corruption, missing dependencies, or installation issues. The repair
process preserves your worlds and configurations while fixing the underlying server
installation problems.
Update from ZIP
The Update from ZIP feature allows you to manually update your server by selecting a
ZIP file containing a new server version. This is particularly useful for:
- Installing custom server builds or modded server versions
- Updating to specific server versions that aren't the latest release
- Installing beta or preview server versions
- Updating servers when automatic updates aren't available or desired
The update process validates the ZIP file and preserves your server configuration and
world data during installation, ensuring a safe update process even with custom server
builds.
Accessing Maintenance Tools
These advanced maintenance tools are available through Settings → Debugging → Server
Maintenance Tools. They complement the automatic update features available on the
Dashboard, providing additional control for users with specific maintenance needs or
advanced server configurations.